Using Kaltura Reach
Captions can greatly enhance the learning experience for many students. Studies have shown that using captions can help students to better understand and retain information. They can also be invaluable for ESOL students and those working in environments where sound cannot be used (noisy environments or where quiet is needed – e.g. a library or studying with sleeping children).
Important information about auto-captions with Kaltura Reach
You can request auto-captions for your videos through your Kaltura My Media Page. However, a couple of important notes before we begin:
- Auto-captions are not perfect – they are getting better but you will need to check them to make sure that they are accurate and correct. Because of this, auto-captions WILL NOT satisfy an accommodation request without remediation.
- You can only request auto-captions for each video one time – if you delete the captions, you will not be able to get a new copy for that file. So DO NOT DELETE the captioning file.
How to request auto-captions
Kaltura media is not captioned by default – follow the steps below to request auto-captions for your videos:
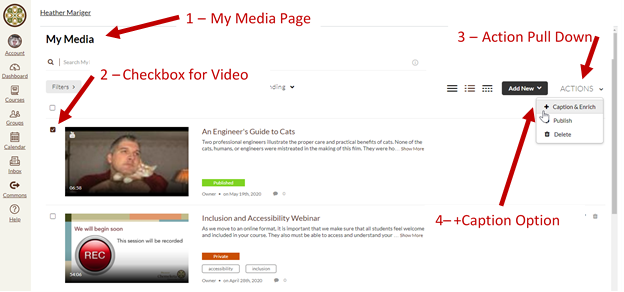
- Visit the My Media Page in Canvas
- Use the checkbox to the left of the video to select the video you want to caption
- Select the pull-down Actions menu
- Select +Caption and Enrich from the menu
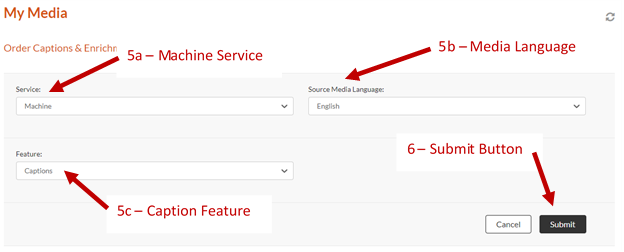
- Select the Service (Machine), Source Media Language, and Feature (Captions).
- Use the Submit Button to send the request
- You will get a message letting you know that your request has been sent and that the video will update when the captions are complete.
Note: the process generally takes less than an hour but could take longer depending on the length of the video and current demand.
Steps 1-4
Steps 5-6
Step 7

How to use the Caption Editor
While auto-captions have come a long way in the past few years, they do not always get it right. You will need to check them to make sure that they are accurate. Luckily, Kaltura Reach has an easy caption editing tool you can use to make any adjustments that are necessary.
To use the caption editor, follow the instructions below:
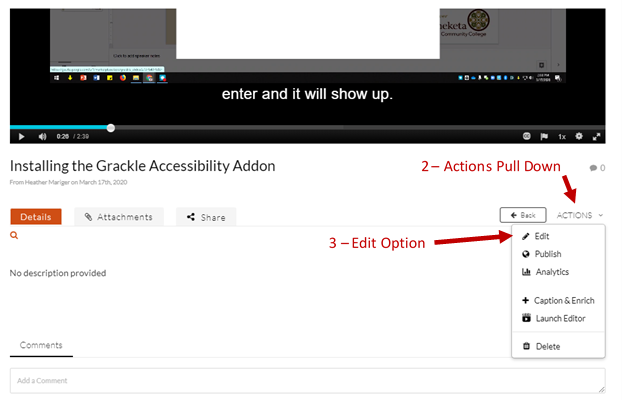
- Select the video from the My Media Page in eLearn – it will open the page for that video.
- Select the pull-down Actions menu below the video on the right side.
- Select Edit from the menu – this will take you to the editing page
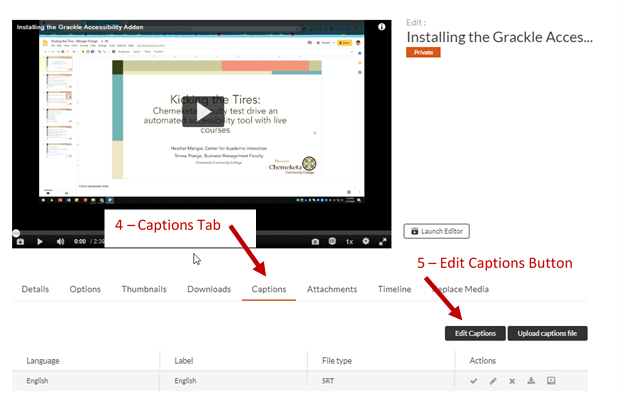
- Select the Captions Tab from the options below the video
- Select the Edit Captions Button to the bottom right of the video
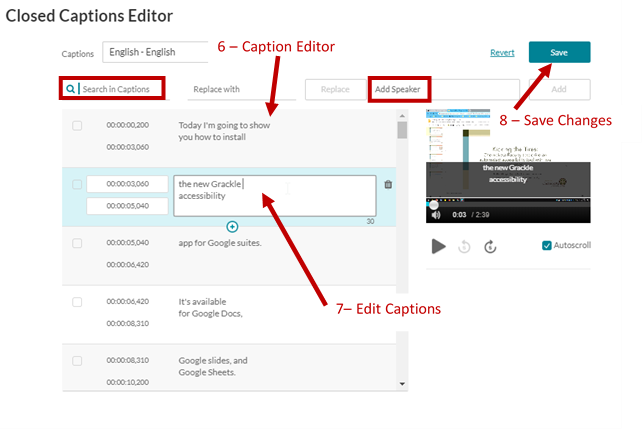
- The caption editor, with timestamps will show to the left of the video
- Make your edits to the video – you can even search for words and identify the speakers!
- When you are done, select the Save Button to the top right of the page.
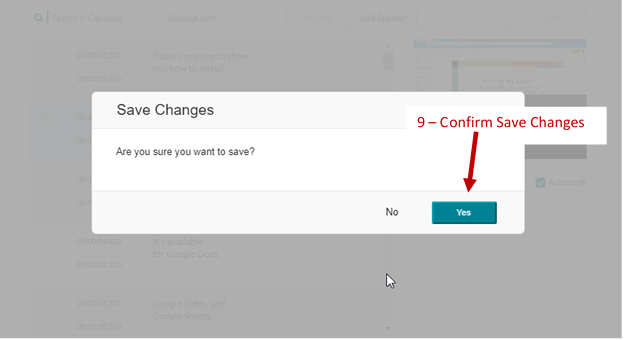
- Confirm your changes and your video is now ready to use.
Steps 2-3
Steps 4-5
Steps 6-8
Step 9
