UPDATE – May 20th, 2025
Discussion Checkpoints are coming to Canvas this summer!
Based on faculty feedback, Canvas recently added improvements to the instructor experience in the SpeedGrader.
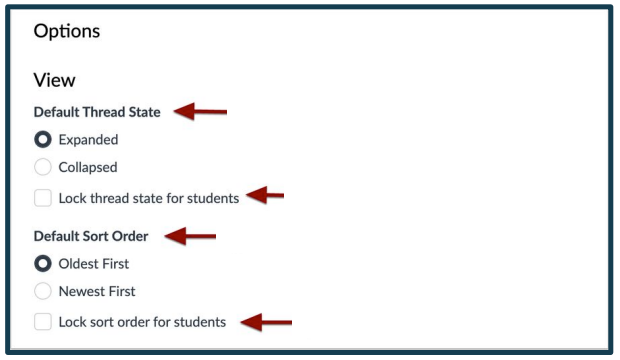
Instructors can switch to view individual posts vs. viewing the full discussion context. When creating or editing a discussion, instructors can configure the default view settings, including thread collapse/expansion and sorting options for students, with the ability to lock these preferences if needed.
What are Discussion Checkpoints?
Discussion checkpoints are scheduled points within a discussion where students are encouraged (or required) to engage by posting an initial response, replying to peers, or reflecting on feedback. These checkpoints are spaced out over the duration of the discussion and can serve multiple purposes, such as keeping students on track, promoting thoughtful responses, and allowing time for reflection and interaction.
Benefits of Using Discussion Checkpoints
- Keeps Students on Track: By requiring responses at set intervals, students are more likely to participate consistently rather than waiting until the last minute.
- Encourages Reflection and Deeper Responses: Spacing out responses allows students to think more critically about each post, promoting thoughtful engagement.
- Enhances Peer Interaction: Checkpoints encourage students to return to the discussion, read others’ responses, and continue conversations, leading to a more dynamic and collaborative learning experience.
- Prevents Overwhelming the Thread: When all students post and reply simultaneously, threads can quickly become overwhelming. Checkpoints help distribute participation over time, making it easier for students and instructors to keep up.
Implementing Discussion Checkpoints in Canvas
Creating checkpoints in Canvas discussions is straightforward. Here’s how:
- Break Down the Discussion Timeline: Instead of a single deadline, establish multiple due dates for initial posts and replies. For example, you might set:
- An initial post due date by midweek (e.g., Wednesday).
- A reply checkpoint to encourage interaction by the weekend (e.g., Saturday).
- Clarify Expectations for Each Checkpoint: In the discussion prompt, explain what is expected at each checkpoint. For example, “By Wednesday, post your initial response. By Saturday, reply to at least two classmates with meaningful feedback.”
- Grade by Checkpoint: This reinforces the importance of each stage and encourages active involvement. While the gradebook shows one column for the discussion, each checkpoint will have its own grade within Speedgrader.
By integrating discussion checkpoints, you can create a structured yet flexible framework that supports meaningful, continuous engagement. It not only fosters richer interactions but also builds a stronger online learning community within Canvas. Give checkpoints a try and see the difference they can make in your discussions!
Changes in SpeedGrader
With this new feature, Canvas has changed how student replies display in the SpeedGrader. Instructors can now view student replies within the context of a threaded discussion.
When grading an individual student, their replies will be highlighted in blue. Instructors can use the Next/Previous Reply buttons to navigate to each reply for a particular student when grading.
NOTE: if a student has only posted a single reply, the Next/Previous button will not have any effect.
Configure Default View Settings
When creating or editing a discussion, instructors can configure the default view settings, including thread collapse/expansion and sorting options for students, with the ability to lock these preferences if needed.

Get Started
To add checkpoints to your discussion, be sure it is set to be a graded discussion, then assign graded checkpoints.

Next, assign the points possible for the initial reply, the number of additional replies required and the points possible for the additional replies. All of these points will automatically add up to a total points possible.

Finally, set the due dates for the initial post and additional replies. For a detailed walkthrough of this process, watch the video below.

