In this Canvas release:
- Manage Dates & Assign To Settings: the user interface has been redesigned for managing dates and assign to settings.
- Module and Assignment Differentiation: instructors can assign students to an entire module and individual module items.
- Inbox Add Signature to Messages: instructors and students now have the option to configure a signature when composing a message.
View full release notes from Canvas Support: Canvas Release Notes (2024-07-20).
Click to expand the accordions below to view more detailed information about each new feature.
Manage Dates & Assign To Settings - Interface Update
Assignments, Discussions, Quizzes, Pages
Manage Dates and Assign To – Interface Update
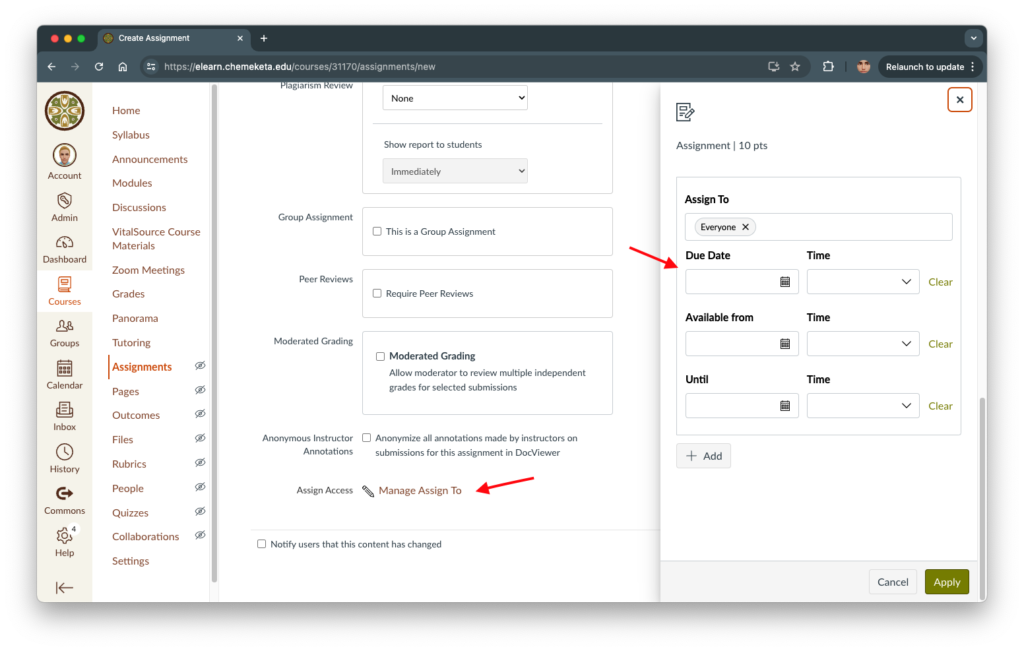
In the settings area for Assignments, Discussions, and Quizzes an Assign To button and Manage Assign To link is available.
Instructors can manage due dates and availability dates as well as Assign To settings.
This update streamlines instructor workflow and improves the ability to differentiate instruction.
Feature Workflow

Assign To Tray
Instructors can differentiate assignments, graded discussions and quizzes as well as manage due dates and availability dates in the redesigned tray. Then, click the Apply button.
Assign To Tray Displays Inherited Assignments
When editing in the Assign To tray, inherited assignments display if available.
Manage Assign To Pending Changes Pill
After applying changes and closing the tray, a pill displays stating that changes are not yet saved. To save changes, click the Save button [2].
Module and Assignment Differentiation
Modules
Module and Assignment Differentiation
On the Modules page, instructors can assign students to an entire module and individual module items from the Modules page.
Additionally, the Add Module and Edit Module Settings pages are redesigned as trays.
Notes:
- If a student is assigned only a specific item within a module and not the entire module, they will see only that item in the feature area, such as an assignment on the assignment page, and not the rest of the module.
- If a student is assigned an entire module, but only specific items within that module, students can only view the items they are assigned.
This feature improves the differentiation of Modules to create a more dynamic and adaptive learning environment.
Feature Video
Feature Workflow
Add Module Tray
When creating a new module, the Add Module modal is changed to a tray.
Edit Module Tray
When editing a module, the Edit Module Settings is redesigned to display as a tray with a Settings tab and an Assign To tab.
Note: The existing module settings remain unchanged.
Assign To Tray
Using the Assign To tab, instructors can set the module visibility to Everyone [1] or assign it to specific students [2]. In the Assign To field [3], instructors can select students or sections using the drop-down menu, typing student names, SIS IDs (if available), or section names . Lastly, click the Save button [4].
Note: By default, the modules and items are assigned to everyone.
Module Assign To Link
On the Modules page, instructors can also access the Assign To tab by clicking the Options icon [1]. Then, select the Assign To link [2].
View Assign To Link
When a module is differentiated for specific students, a View Assign To link displays to easily review or edit visibility.
Note: The View Assign To link does not display if the module is assigned to everyone.
Module Item Assign To Link
To assign a specific module item to a student, click the Options icon [1], then select the Assign To link [2].
Module Item Assign To Tray
After selecting the Assign To link, a tray displays where instructors can differentiate assignment availability dates and due dates. Then, click the Save button.
Module Item Assign To Tray for Pages
Additionally, instructors can edit and differentiate visibility dates for students for pages.
Note: Pages and ungraded discussions cannot be assigned due dates.
Additional Details
This feature is not available in the Mobile app. However, the feature can be used on a mobile device when viewing in a web browser.
Inbox Add Signature to Messages
Inbox
Add Signature to Messages
When the Enable Inbox Signature Block is enabled, users have the option to configure a signature when composing a message. Additionally, admins have the option to disable the Inbox Signature Block for students.
Note: The Enable Inbox Signature Block setting is disabled by default.
This feature streamlines communication and enhances the effectiveness and professional appeal of inbox messages.
Feature Workflow
Account Setting Enable Signature Block
In Account settings, select the Enable Inbox Signature Block checkbox to enable for all users.
To disable this feature for students select the Disable Inbox Signature Block for Students checkbox.
Note: By default, the Disable Inbox Signature Block for students checkbox is not selected.
Inbox Settings Icon
In the Inbox, click the Settings button.
Create Signature Modal
To create a signature, select the Signature On radio button [1] and enter the desired signature in the Signature field [2]. Then, click the Save button [3].
Compose Message Signature Display
Once a signature is saved, it displays in the message body when composing a message.


